12
26
2011
0

在github搭建Arch软件仓库

想搞一个Arch软件仓库。没钱买服务器,就想着扔到个代码托管网站。本来想用google code,结果SVN总是连不上,最后在github弄了个:pakkuman

Arch的软件仓库构造简单,所以放git上也没啥难的。速度还不错,起码能达到100KB/s(以前github慢死了,现在好多了)。

目前没啥特色,主要是验证一下想法。

pacman.conf:

[pakkuman]
Server = https://raw.github.com/cuihaoleo/pakkuman/master/$arch

目前的软件包(随便找了几个以前编译的):

cuihao@cuihao-arch ~ $ pacman -Sl pakkuman
pakkuman amule-dlp-hg 20111016-1 [已安装]
pakkuman freetype2-git-infinality 2.4.99.git20111130-1 [已安装]
pakkuman gtkqq-git 20111226-1 [已安装]
pakkuman ibus-cloud-pinyin-svn 148-1 [已安装]
pakkuman python-webqq-svn 15-1 [已安装]

Category: 计算机 | Tags: arch linux git 软件
12
2
2011
0

Arch下systemd无法开机执行rc.local之解决方法

早就发现了,Arch的systemd提供的那个 rc-local.service 貌似有问题,rc.local不会执行。因为没用rc.local,一直没管。


解决方法源自这里,需要稍加改动: http://superuser.com/questions/278396/systemd-does-not-run-etc-rc-local


建立文件 /etc/systemd/system/rclocal.service (我怕和系统自带的service冲突,改了个名字),内容为:

[Unit]
Description=/etc/rc.local Compatibility
ConditionPathExists=/etc/rc.local

[Service]
Type=forking
ExecStart=/etc/rc.local
TimeoutSec=0
StandardOutput=tty
RemainAfterExit=yes
SysVStartPriority=99

[Install]
WantedBy=multi-user.target

干掉旧的service:

systemctl disable rc-local.service

上新的service:

systemctl enable rclocal.service

重启动检验。

Category: 计算机 | Tags: arch systemd linux
11
19
2011
0

基本断网,设计conky

他丫的广电Cable猫上网又必须用Win-only客户端了,多次交涉无果,准备换电信联通的。

不开客户端只能随机地上一小部分网站,可喜的是包括google、is-programmer。开着网页代理能维持基本上网需要。


周末了无聊,就设计conky。连不上网缺乏素材啊缺乏素材~~~,所以也没设计啥高端功能:


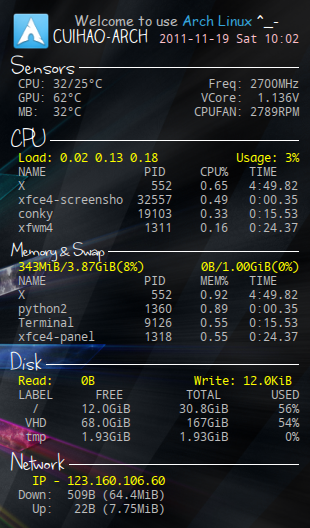
下面是conkyrc,严重依赖我的硬件:

own_window yes
own_window_type desktop
own_window_transparent yes
own_window_argb_visual true
own_window_hints undecorated,below,sticky,skip_taskbar,skip_pager
out_to_console no
use_xft yes
override_utf8_locale yes
xftfont Droid Sans Mono:size=10
update_interval 2
double_buffer yes
draw_shades no
draw_outline no
draw_borders no
stippled_borders 10
border_width 1
default_color white
default_shade_color white
default_outline_color white
alignment top_right
gap_x 12
gap_y 37
use_spacer left
no_buffers yes

TEXT
${image /usr/share/icons/Faenza/places/48/distributor-logo-archlinux.png -s 40x40 -p 0 0}         ${color gray}${font Comic Sans MS:size=12}Welcome to use ${color #35a3da}Arch Linux${color} ^_-${font}${color}
      ${font Claire Hand:size=16}${color white}${nodename}${font}${alignr} ${color pink}${time %F %a %R}
${font where stars shine the brightest:size=32}${color white}Sensors ${hr}${font}${color grey}
 CPU: ${execi 2000 cat /sys/bus/pci/drivers/k8temp/0000:00:18.3/temp1_input | head -c -4}/${execi 2000 cat /sys/bus/pci/drivers/k8temp/0000:00:18.3/temp3_input | head -c -4}°C ${alignr} Freq: ${freq}MHz
 GPU:${nvidia temp}°C ${alignr} VCore:  ${execi 2000 ~/.conky/getnum /tmp/.conky/hwmon/in0_input 3 1000}V
 MB:  ${execi 2000 ~/.conky/getnum /tmp/.conky/hwmon/temp2_input 0 1000}°C ${alignr} CPUFAN: ${execi 2000 cat /tmp/.conky/hwmon/fan2_input}RPM
${font where stars shine the brightest:size=32}${color white}CPU ${hr}${font}
 ${font Monaco:size=10}${color yellow}Load: ${loadavg} ${alignr} Usage: ${cpu 0}%${font}
 ${color grey}NAME              PID     CPU%   TIME${color grey}
 ${top name 1} ${top pid 1}  ${top cpu 1} ${top time 1}
 ${top name 2} ${top pid 2}  ${top cpu 2} ${top time 2}
 ${top name 3} ${top pid 3}  ${top cpu 3} ${top time 3}
 ${top name 4} ${top pid 4}  ${top cpu 4} ${top time 4}
${font where stars shine the brightest:size=24}${color white}Memory & Swap ${hr}${font}
${font Monaco:size=10}${color yellow}$mem/$memmax($memperc%)${alignr}$swap/$swapmax($swapperc%)${font}
 ${color grey}NAME              PID     MEM%   TIME${color grey}
 ${top_mem name 1} ${top_mem pid 1}  ${top_mem mem 1} ${top time 1}
 ${top_mem name 2} ${top_mem pid 2}  ${top_mem mem 2} ${top time 2}
 ${top_mem name 3} ${top_mem pid 3}  ${top_mem mem 3} ${top time 3}
 ${top_mem name 4} ${top_mem pid 4}  ${top_mem mem 4} ${top time 4}
${font where stars shine the brightest:size=30}${color white}Disk ${hr}${font}
 ${font Monaco:size=10}${color yellow}Read: ${diskio_read} ${alignr} Write: ${diskio_write} ${color grey}${font}
 LABEL      FREE         TOTAL${alignr}USED
   /      ${fs_free /}       ${fs_size /}${alignr}${fs_used_perc /}%
  VHD     ${fs_free /mnt/VHD}       ${fs_size /mnt/VHD}${alignr}${fs_used_perc /mnt/VHD}%
  tmp     ${fs_free /tmp}       ${fs_size /tmp}${alignr}${fs_used_perc /tmp}%
${font where stars shine the brightest:size=30}${color white}Network ${hr}${font}
   ${font Monaco:size=10}${color yellow}IP - ${addr eth0}${color grey}${font}
 Down: ${downspeed} (${totaldown})
   Up: ${upspeed} (${totalup})


我的系统上有两个hwmon(监控硬件状态)设备,开机时内核分配的编号不确定,所以无法用conky的hwmon解决。就写了个脚本,在运行conky前先调用这个脚本,选择适当hwmon链接到一个固定目录:

#!/bin/sh

mkdir -p /tmp/.conky
rm -rf /tmp/.conky/hwmon
if [ -e "/sys/class/hwmon/hwmon0/name" ]; then
    ln -s "/sys/class/hwmon/hwmon0" /tmp/.conky/hwmon
else
    ln -s "/sys/class/hwmon/hwmon1" /tmp/.conky/hwmon
fi


工具getnum是用来从文本文件中读取数字的,用法是:getnum 文件 A B,最后输出的结果是文件中读取的浮点数字N/B,保留A位输出。

在网上看到的例子是用cat和echo解决的,但我怕效率低,就自己写了个:

#include <stdio.h>
#include <stdlib.h>

int main (int argc, char *argv[])
{
    freopen(argv[1], "r", stdin);

    if (argc != 4)
        exit(1);

    float num;
    scanf("%f", &num);
    num /= atoi(argv[3]);

    char fm[8];
    snprintf(fm, 8, "%%.%sf", argv[2]);
    printf(fm, num);

    return 0;
}
Category: 生活 | Tags: conky linux 美化 桌面
10
10
2011
11

神奇的UNIX文件,用cat把ISO写到U盘

cuihao同学在学校机房发回报道

有一句话叫做"In UNIX Everything is a File"。在UNIX(包括Linux)中,文件可以用来代表各种东西,包括硬件设备、磁盘分区、网络链接、内核、终端…… 通过这种设计,你可以统一地使用简单的cat、echo命令控制硬件、与内核交互、进行网络通讯等等,我们不必为了完成这些操作专门编程调用系统API。简单的命令拥有了新的生命力,SHELL也因此变得强大。


来点简单的例子:

/dev/ttyX 是代表tty(ctrl+alt+Fn看到的那个命令行界面)的文件。尝试如下命令:

su -c "echo 'hi, tty9' > /dev/tty9"

就是用echo把一串字符输出到 /dev/tty9 文件中(使用su命令是因为普通用户没有使用tty设备文件得权限)。然后用Ctrl+Alt+F9切换到 tty9,会发现那串字符果然显示在tty上了。

再试试cat命令:

su -c "cat /dev/tty9"

键入后,cat处于等待输入的状态。进入tty9,输入一些内容,再切回原来的终端,键入的内容都被cat捕获了。键入Ctrl+D(文件结束符),cat就会终止。


然后是主题,用cat写ISO:

把ISO文件test.iso写入U盘设备(比如 /dev/sdc,会破坏数据,小心):

cat test.iso > /dev/sdc

自己加su用root执行。命令执行完毕后,你的U盘的分区表应该已经被破坏了 ^^ ISO已经写入到U盘中。可以使用这个技巧制作系统安装盘。很神奇的“设备文件”吧。

另外,使用后重新格式化U盘时,可能需要重建一下分区表。

Category: 计算机 | Tags: Linux ISO 文件系统 UNIX
9
26
2011
0

用mencoder把外挂字幕内嵌到视频中

我的手机档次低,只支持MP4格式,不支持外挂字幕。下的好多外国片都是外挂字幕(或是mkv内置字幕)的,所以想把字幕直接加到图像上。


根据网上的搜索,得到下面一条命令:

mencoder 输入文件 -o 输出文件.mp4 \
-oac lavc -ovc lavc -of lavf \
-lavcopts aglobal=1:vglobal=1:vcodec=mpeg4:vbitrate=180 \
-lavcopts acodec=libfaac \
-af lavcresample=8000 \
-vf harddup,scale=320:-10,unsharp=l3×3:0.7,expand=320:240 \
-ofps 16 -lavfopts format=psp -srate 22050 \
-sub 字幕文件 -font 中文字体路径(如/usr/share/fonts/TTF/ukai.ttc) \
-subfont-text-scale 字号(5就可以了) -subcp 编码(utf8可省略)

最后两行是加字幕的,前面的都是格式转换(转换到PSP的MP4格式)。

vbitrate、lavcresample、ofps 应该是和画/音质有关的参数。我都调得很低,这样转换比较快。反正手机屏幕那么小,也看不到什么细节。


但这样我发现中文全都显示为下划线(不是乱码),怎么换字体/转字幕格式都没用。搜索之后,找到了解决方法。编辑 ~/.mplayer/mencoder.conf 文件,加入一行“fontconfig=0”,禁用fontconfig设置就可以了。不设置这个的话,-font参数设置字体不起作用。


这样,中文就解决了。但还有严重问题,就是转换出来的图像,不知何故旧字幕不会消失,重叠在一起乱七八糟的。试了一下,发现只要加scale/expand参数缩放图像,出来的字幕就有问题。

我的解决方案如下,转换两次:第一次不加字幕,只转换格式、缩放图像;第二次只加字幕,这样就没有问题了。


不懂mencoder,只是凭感觉照葫芦画瓢写命令。不知有没有更简便的方法。


9
10
2011
7

e4rat:大幅提升Linux开机速度

警告:此软件仅限原生ext4文件系统使用。其他文件系统以及从低版本升级的ext4文件系统用户不要使用,否则将导致灾难性后果。 本着负责的态度,先Warning。 

e4rat是个好东西。其原理大致是(我猜的):通过磁盘整理有序化开机要加载的文件,并在系统启动阶段把数据预读到内存,充分使用内存和IO资源。

AUR上大家的溢美之词:

snack 发表于 Mon, 20 Jun 2011 23:03:28 +0000

Just one word: amazing! Can't believe such an improvement can be obtained so simply. Definitely one of the most notable utilities I've ever tried.

bwat47 发表于 Sat, 11 Jun 2011 00:55:03 +0000

Very impressive stuff! I have a laptop with a 5400rpm drive. This made like halved my boot time (gdm starts way faster, login is faster) all my apps like chrome/banshee/empathy start as fast as if they were cached in memory already :)

drexya 发表于 Sat, 04 Jun 2011 02:52:06 +0000

Wow, impressive results Oo.

可以看看官方给的效果图Amazing诶!

使用前

使用后


本文针对Arch系统,介绍一下使用方法。

1. 系统要求:

根文件系统是原生ext4,即一开始就格式化成ext4了,不是从ext2、ext3升级的。

内核支持audit。repo中的内核都支持,手动编译内核的需要注意一下。

2. 安装:

yaourt -S e4rat

或者自己从AUR下载脚本编译。

3. 收集信息:

grub中Linux启动项最后加上参数:

init=/sbin/e4rat-collect

启动后e4rat会记录120秒内系统打开的文件。可以在 /etc/e4rat.conf 修改等待时间(timeout)。

PS:据我观察,收集信息时系统启动会变得格外的慢,可能要一分钟以上。

4. 整理磁盘:

收集信息后,会生成 /var/lib/e4rat/startup.log 文件,里面记录的就是启动时打开的所有文件。然后要整理磁盘,该操作需要在单用户模式下执行:

sudo init 1

然后:

e4rat-realloc  /var/lib/e4rat/startup.log

5. 大功告成:

修改grub菜单文件,Linux启动项参数加入:

init=/sbin/e4rat-preload

重启后e4rat就开始工作了。

6. 其他:

a. 不要让e4rat预读太多东西,启动到桌面就足够了。如果预读太多东西(比如浏览器、文本编辑软件),反而会拖慢开机速度。

b. 以上都是针对Arch默认的init程序。如果你使用其他init机制,比如systemd,需要修改 /etc/e4rat.conf ,设置init参数:

init /bin/systemd

c. 该软件对SSD固态硬盘没什么作用。

| Theme: Aeros 2.0 by TheBuckmaker.com